
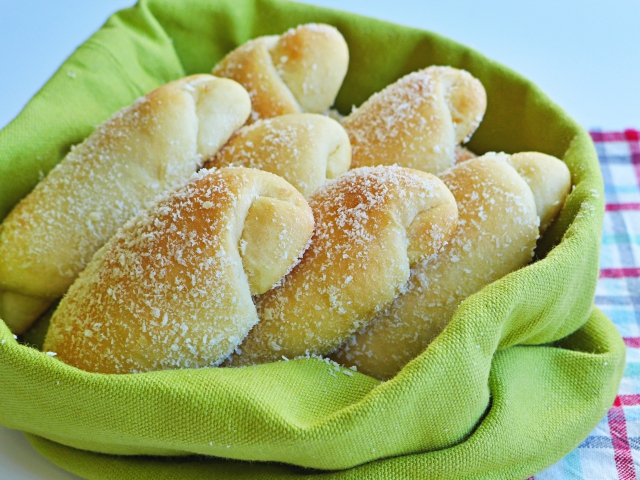
Spanish bread is another Filipino bakery favorite. Learn how to make these at home.
Next to pandesal, Spanish bread is my next favorite bakery staple.
I have been making different recipes from the internet, most of which yielded disappointing rolls.
While the dough was fine, the filling was not.
Most recipes have you fill the rolls with softened butter, then sprinkle sugar and breadcrumbs. And as the rolls bake, the filling ooze out.
NOT GOOD!
Until I came to this recipe.
I used my pandesal recipe for the bread, and used the filling.
HEAVEN.
I have found my Spanish bread.
HAPPINESS!
How to Make Spanish Bread?

We start with making the dough.
Go and read how to make pandesal dough first. I gave a lot of tips on how to make the best rolls. If you are new to making bread, I strongly suggest you give it a read.
Then come back here and we will discuss how to make the filling and how to form the rolls.
You’re back and ready to make Spanish bread?
.
Note, that the full recipe for the pandesal will also make 24 Spanish bread. If that is too much, simply halve the pandesal recipe. I give you the halved recipe below.
Or do what I usually do, make half the dough into pandesal and half into Spanish bread.
Both my favorites made in one go!
But that is me.
I leave you to decide.
First, make the dough.

USING A STAND-MIXER
If using active-dry yeast, activate the yeast first. Dissolve the yeast in ¼ cup (60 milliliters) of warm water and 1 teaspoon sugar. Let stand for 5 to 10 minutes. If the mixture starts bubbling and increases in volume, the yeast is active and alive. If not, repeat this step with a new packet of yeast.
If using instant yeast, mix the yeast directly into the flour.
Weigh or measure out your flour into the bowl of your stand mixer. If using different types of flour, mix well.
Add in the salt and sugar. Mix on low using the paddle attachment.
Add in the softened butter and mix on low speed until distributed evenly.
Add in the instant yeast/activated yeast. Drizzle in the water. Start with 9 tablespoons/135 ml (include the water in the yeast mixture in this if you have activated the yeast.) If the dough is still too dry, slowly drizzle in more water until the dough is well moistened, but not too wet.
If you have added too much water, add more flour, a tablespoon at a time.
Optional (but highly recommended) step: autolyse.
Cover the bowl and let it rest for at least 30 minutes and up to an hour.
Change to the hook attachment and knead for 5 minutes (with autolyse) to about 15 minutes (without autolyse.) Then test the dough by pinching a piece and stretching into a square. If you get a window pane, your dough is ready. If not, continue kneading and testing every 5 minutes.
Once the dough is ready, scrape down and form the dough into a ball. Using the same bowl, cover and set aside for an hour or until it has doubled in size. Set in a warm area if your kitchen is too cold. In winter, I heat the oven quickly (turn on 1 minute at 100°C) and turn off and leave the light on. Then I put the bowl in the oven.
Or bulk rise in the fridge overnight.
BY HAND
Same note for the yeast as above.
Weigh or measure out your flour into the bowl of your stand mixer.
Add in the salt and sugar. Mix well with a wire whisk.
Add in the butter, and work into the flour with your fingers. To do so, use your finger tips and rub the flour and butter together.
Once the butter is incorporated, make a well in the middle and add in the water and yeast. Start with 9 tablespoons/135 ml (include the water in the yeast mixture in this if you have activated the yeast) and mix in with a rubber spatula. If too dry, slowly add in more water a little at a time until you get a shaggy dough.
Cover with a kitchen towel and set aside to autolyse for at least 30 minutes (up to an hour).
After the autolyse, turn out the dough onto your work area and knead for 2 to 5 minutes.
Cover again and set a timer for 30 minutes.
After 30 minutes, do a series of stretch and folds.
At this point, you may then continue with the bulk rise. Set the dough aside for an hour or until it has doubled in size. Set in a warm area if your kitchen is too cold. In winter, I heat the oven quickly (turn on 1 minute at 100°C) and turn off and leave the light on. Then I put the bowl in the oven.
Or bulk rise in the fridge overnight.
Make the filling for Spanish bread

An hour before you will form the rolls, make the filling.
Melt the butter in a small saucepan. Add the flour and cook for a minute. Add the breadcrumbs, milk, sugar, salt. Continue cooking until a thick paste forms.
Set aside in a shallow bowl until cool.
To form the Spanish bread:
You will need extra breadcrumbs.
Pre-shape the Spanish bread
Divide the dough into 12 pcs, roughly 44 grams each. Roll each piece into a ball and set aside. You do this by tucking the dough into the bottom to form a taut ball and then placing the dough on your work surface and roll around by cupping each dough into your palm.
Here is a video showing that:
Place them neatly in a row/rows.
Once all the dough has been pre-shaped into balls, we will now make the rolls.
Divide the filling into 12. I usually do this by drawing lines into the filling, kind of like cutting a cake.
Start with the first ball made, shape it into a flat, inverted triangle using your fingers and the heel of your palm. Get one piece of filling and spread it out into the middle of the triangle, leaving an edge of about a centimetre unfilled. Roll it tightly, starting at the wider end. Pinch the end to ensure it does not unfurl when baked.
Here is a video showing how to shape the Spanish bread:
Coat in the breadcrumbs and arrange on your lined baking sheet seam side down, making sure there is space in between as these will still rise. Cover with a dry kitchen towel and let rest until it has puffed up a bit (but not doubled), 30 minutes to 1 hour (depending on how cold your kitchen is.)

While the rolls are proofing, preheat oven to 375°F/180°C. When the rolls are ready, bake in the oven for 18-20 minutes.

Spanish Bread Video
Pin the Spanish Bread Recipe here:

Other Filipino Recipes you might like:
Calories
Fat
Carbs
Protein

Tweety
Serves 12 or 24
Spanish bread is a Filipino bakery favorite. This is how to make it at home.
4 hrPrep Time
20 minCook Time
4 hr, 20 Total Time

 Save Recipe
Ingredients
- 250 g (around 2 cups) bread flour or all-purpose flour
- 45 g (3.5 tbsp) granulated sugar
- 150 g (1/2 cup + 2 tbsp) warm water (around 30°C/86°F is fine)
- 3.5 grams (1/2 tsp) fine sea salt
- 50 g (around 3.5 tbsp) unsalted butter, at room temperature
- 3 g (1 tsp) instant yeast or active-dry yeast
- ¼ cup (56 g) butter
- 2 tsp (6g) flour
- ½ cup (60 g normal bread crumbs OR 35 g panko bread crumbs, blitzed in food processor)
- 1/2 c not packed (65 g) brown sugar
- 1/8 tsp (1 g) salt
- 2 tbsp (30 ml) milk
- 500 g (around 4 cups) bread flour or all-purpose flour
- 90 g (7 ¼ tbsp) granulated sugar
- 300 g (around 1 ¼ cup) warm water (around 30°C/86°F is fine)
- 7 grams (1 tsp) fine sea salt
- 100 g (around 7 tbsp) unsalted butter, at room temperature
- 1 packet (about 2 ¼ teaspoons, 7 grams) instant yeast or active-dry yeast
- 7 tbsp (100 g) butter
- 4 tsp (12 g) flour
- 1 c (120 g normal bread crumbs OR 70g panko bread crumbs, blitzed in food processor)
- 1/2 c packed (100 g) brown sugar
- ¼ tsp salt
- ¼ c (60 ml) milk
Directions
- If using active-dry yeast, activate the yeast first. Dissolve the yeast in ¼ cup (60 milliliters) of warm water and 1 teaspoon sugar. Let stand for 5 to 10 minutes. If the mixture starts bubbling and increases in volume, the yeast is active and alive. If not, repeat this step with a new packet of yeast.
- If using instant yeast, mix the yeast directly into the flour.
- Weigh or measure out your flour into the bowl of your stand mixer. If using different types of flour, mix well.
- Add in the salt and sugar. Mix on low using the paddle attachment.
- Add in the softened butter and mix on low speed until distributed evenly.
- Add in the instant yeast/activated yeast. Drizzle in the water. Start with 9 tablespoons/135 ml (include the water in the yeast mixture in this if you have activated the yeast.) If the dough is still too dry, slowly drizzle in more water until the dough is well moistened, but not too wet.
- If you have added too much water, add more flour, a tablespoon at a time.
- Cover the bowl and let it rest for at least 30 minutes and up to an hour.
- Change to the hook attachment and knead for 5 minutes (with autolyse) to about 15 minutes (without autolyse.) Then test the dough by pinching a piece and stretching into a square. If you get a window pane, your dough is ready. If not, continue kneading and testing every 5 minutes.
- Once the dough is ready, scrape down and form the dough into a ball. Using the same bowl, cover and set aside for an hour or until it has doubled in size. Set in a warm area if your kitchen is too cold. In winter, I heat the oven quickly (turn on 1 minute at 100°C) and turn off and leave the light on. Then I put the bowl in the oven.
- Or bulk rise in the fridge overnight.
- Same note for the yeast as above.
- Weigh or measure out your flour into the bowl of your stand mixer.
- Add in the salt and sugar. Mix well with a wire whisk.
- Add in the butter, and work into the flour with your fingers. To do so, use your finger tips and rub the flour and butter together.
- Once the butter is incorporated, make a well in the middle and add in the water and yeast. Start with 9 tablespoons/135 ml (include the water in the yeast mixture in this if you have activated the yeast) and mix in with a rubber spatula. If too dry, slowly add in more water a little at a time until you get a shaggy dough.
- Cover with a kitchen towel and set aside to autolyse for at least 30 minutes (up to an hour).
- After the autolyse, turn out the dough onto your work area and knead for 2 to 5 minutes.
- Cover again and set a timer for 30 minutes.
- After 30 minutes, do a series of stretch and folds.
- At this point, you may then continue with the bulk rise. Set the dough aside for an hour or until it has doubled in size. Set in a warm area if your kitchen is too cold. In winter, I heat the oven quickly (turn on 1 minute at 100°C) and turn off and leave the light on. Then I put the bowl in the oven.
- Or bulk rise in the fridge overnight.
- An hour before you will form the rolls, make the filling.
- Melt the butter in a small saucepan. Add the flour and cook for a minute. Add the breadcrumbs, milk, sugar, salt. Continue cooking until a thick paste forms.
- Set aside in a shallow bowl until cool.
- You will need extra breadcrumbs.
- Pre-shape the Spanish bread
- Divide the dough into 12 pcs, roughly 44 grams each. Roll each piece into a ball and set aside. You do this by tucking the dough into the bottom to form a taut ball and then placing the dough on your work surface and roll around by cupping each dough into your palm.
- Place them neatly in a row/rows.
- Once all the dough has been pre-shaped into balls, we will now make the rolls.
- Divide the filling into 12. I usually do this by drawing lines into the filling, kind of like cutting a cake.
- Start with the first ball made, shape it into a flat, inverted triangle using your fingers and the heel of your palm. Get one piece of filling and spread it out into the middle of the triangle, leaving an edge of about a centimetre unfilled. Roll it tightly, starting at the wider end. Pinch the end to ensure it does not unfurl when baked.
- Coat in the breadcrumbs and arrange on your lined baking sheet seam side down, making sure there is space in between as these will still rise. Cover with a dry kitchen towel and let rest until it has puffed up a bit (but not doubled), 30 minutes to 1 hour (depending on how cold your kitchen is.)
- While the rolls are proofing, preheat oven to 375°F/180°C. When the rolls are ready, bake in the oven for 18-20 minutes.
Notes
Prep time includes rise time


