
A copycat recipe of the famous Conti’s Mango Bravo.
I got a request to make a mango bravo cake for a friend’s husband’s 50th birthday.
I have never made this before.
In fact, I cannot remember even tasting this cake the last time I ate at Conti’s. But of course, the internet had so many copycat mango bravo recipes on offer. I perused quite a lot of them and after reading so many recipes, decided to try a couple ones.
I noticed that the mango bravo cake had the following components:
Cashew Meringue
Chocolate Mousse
Whipped Cream Filling and Icing
Mango cubes
Chocolate drizzle
However, since I have a small freezer, I didn’t want to make the tall round cake similar to Conti’s. I decided to make a smaller rectangular one instead. But even this smaller cake makes enough for 16 servings! A small slice is quite enough to satiate your sweet tooth.
I have since made this cake 4 times and have fiddled with the recipe until this latest one is the one I am happiest with (with honest feedback from my tasters).
At the moment, I don’t have a lot of pictures, especially of the process. And to be honest, they are not good ones too. I will update this post once I make this again and get step-by-step pictures. But, since I am so excited to share this recipe with you, I wanted to get this out.
Let us go through the components of this mango bravo recipe one by one.

Cashew Meringue
I used the cashew meringue in my sans rival recipe with a few changes. First, instead of making 6 thin layers, I made 3 thicker layers and baked them for longer, at 140°C for 1hr30 minutes up to 2 hours, or until the meringue layers are dry to touch. Then I leave them in the oven until they are cool.
Also, if you are in the know, the Conti’s meringue layers are way thicker than mine. If you want that, you may double the cashew meringue recipe and make even thicker layers. But be warned it may take even longer to bake. I’ve read in some recipes they take 6 to 8 hours in the oven!
We found the thinner meringue to be enough and complemented the chocolate mousse and the whipped cream perfectly.
Chocolate Mousse
I adapted the chocolate mousse recipe from Cooking With Kurt as I needed less mousse. This chocolate mousse has additional egg yolks which keep the mousse from not hardening too much in the freezer. My first trials had only sugar, melted chocolate, and whipped cream. I was not too fond of the frozen texture.
It goes without saying that you should use the best chocolate you can find too, as that will greatly influence the final taste of the chocolate mousse.
Stabilized Whipped Cream
I used the stabilized whipped cream recipe from Heart of Mary and lessened the quantity to what I needed. Instead of just whipped cream, cream cheese is added to the cream to stabilize it and make it easier to pipe with. Also, if you have access to Sahnesteif, a whipped cream stabilizer which I find in most German and Swiss grocery stores, use it too.
Mango Cubes
This can be quite tricky here in Germany and Switzerland, and while the recipe needs only 2 mangoes, I usually buy 3 or 4 to ensure that I get some good ones.
Chocolate Drizzle
I am lazy and I used storebought chocolate syrup or omit it. I suppose you can make a chocolate ganache too or a chocolate shell, but I haven’t tried those.
TIPS FOR MAKING MANGO BRAVO
- Make sure you have space in your freezer. The finished cake will be around 17 X 22 cm and around 9 to 10 cm tall.
- Make this over a couple of days. First, make your cashew meringue wafers, then wrap each one well in cling wrap and freeze.
- You may make the rest in a couple of hours, or may separate as well into another couple of days.
- The mango bravo should be finished at least the day before you plan to serve it.
- If you live in a cold climate, take out the cake at least an hour before serving so that the mousse and cream may soften a bit and be easier to slice. In a warmer climate, I would say 30 minutes or less. Use your judgement. The stabilized whipped cream used means it won’t melt very fast.
- I sometimes omit the chocolate topping as I find it doesn’t really add much to the overall experience of the cake. The chocolate mousse adds enough chocolate oomph.
- If you don’t have a cake board, cut out a cardboard rectangle measuring around 20 x 25 cm (or slightly bigger, depending on how much space you have in your freezer) and cover well with aluminum foil. That is what I usually do as I don’t have rectangular cake boards on hand.

So, without further ado, here is the recipe.

Copycat Mango Bravo Recipe
Equipment
- stand or hand mixer
- oven
- baking pans
- offset spatula
- piping bag with star tip
Ingredients
Cashew Meringue
- 150 g roasted cashew nuts
- 35 g corn starch
- 6 egg whites
- 1/2 tsp cream of tartar or lemon juice
- pinch salt
- 150 g granulated sugar
- 1 tsp vanilla extract
Chocolate Mousse
- 175 g dark chocolate minumum 60% dark
- 60 g unsalted butter
- pinch salt
- 3 egg yolks
- 180 g whipping cream
- 30 g granulated sugar
Filling
- 200 g whipping cream
- 100 g cream cheese
- 50 g powdered sugar
- 1 pack Sahnesteif optional
- 1 tsp vanilla or 1/2 pack Vanilla sugar
- 1 ripe mango, cubed
Stabilized Whipped Cream for Icing
- 480 g whipping cream
- 240 g cream cheese
- 100 g powdered sugar
- 2 packs Sahnesteif optional
- 1 tbsp vanilla extract or 1 pack vanilla sugar
Topping
- 1 ripe mango in cubes
Instructions
For the cashew meringue
- First, prepare your baking pans or cookie sheets.Line 2 baking pans or cookie sheets with parchment paper and draw 3 rectangles each measuring 8 x 6 inches (20 x 15cm) Then place the parchment paper with the patterns facing down (so you won’t get the lead from the pencil on you meringues). Don’t forget to GREASE the parchment paper!!! You will want your meringue to come off easily.
- Preheat oven to 285°F/140°C.
- Chop the roasted cashews, but not too fine. I suggest that you have a mix of finely chopped and roughly chopped cashew nuts. A food processor will chop the cashew nuts the fastest, so if you have one, use it. Otherwise, a knife will do the job as well. Place in a bowl and mix in the cornstarch. Set aside.
- Wipe your bowl and whisk attachment with a paper towel and some white vinegar to remove any last traces of grease. Start by beating the egg whites on medium speed with the cream of tartar until soft peaks form. Then, gradually add the granulated sugar and increase the speed to high. Continue beating until stiff. Gently fold in the chopped cashew nuts, cornstarch and vanilla.
- Divide equally among your pans. Spread the meringue as evenly as possible with an offset spatula. Bake for 1hr 30 minutes (or up to 2 hours), rotating the pans every 20 or 30 minutes. The meringue wafers should be golden brown and dry to the touch. Turn off the oven and crack open the door. Let the meringue wafers cool in the oven so that they will retain their crispiness.
- Set aside. If you are making the wafers ahead of time, wrap them well in plastic wrap and freeze until needed.
For the chocolate mousse
- Chop the chocolates and melt with the butter, either on a double boiler or in the microwave. If using the microwave, microwave on 80% for one minute and then in 30-second intervals, mixing each time, until fully melted and smooth. Set aside.
- In a small bowl, whisk the egg yolks and salt until light yellow. Slowly temper by adding a bit of the melted chocolate and butter, then add the egg yolk mixture to the melted chocolate and butter mixture. Let cool to lukewarm.
- When the chocolate mixture is lukewarm, whip the cream and the sugar until stiff. Fold the whipped cream into the chocolate mixture in thirds until it is smooth and homogenous.
ASSEMBLY PART 1
- Place one cashew meringue wafer on a cake board. You may want to add a dollop of chocolate mousse first so that the wafer will stick.
- Spread the chocolate mousse on top of the wafer as evenly as possible. Top with the 2nd wafer and press down and check the sides that the mouse is as even as possible and that the sides are straight.
- Set aside in the freezer.
Make the mango filling
- In a large bowl (or bowl of your stand mixer), place the cream, cream cheese, powdered sugar, vanilla, and Sahnesteif, if using. Mix together on low speed, then increase to high and whip until thick and stiff.
- Fold in the mango cubes.
ASSEMBLY PART 2
- Remove the 1st layer (the one with the chocolate mousse) from the freezer.
- Spread the mango filling as evenly as possible and top with the remaining cashew meringue wafer. Pat down and check the sides and smooth it out and ensure you have straight sides.
- Return to the freezer.
Make the stabilized whipped cream
- In a large bowl, or the bowl of your stand mixer, add all the ingredients.
- Mix together on low speed, then increase to high and whip until thick and stiff.
ASSEMBLY PART 3
- Remove the cake from the freezer. Cover with a thin layer of stabilized whipped cream. Smooth out with an offset spatula.
- Place the rest of the whipped cream into a piping bag with a star tip.
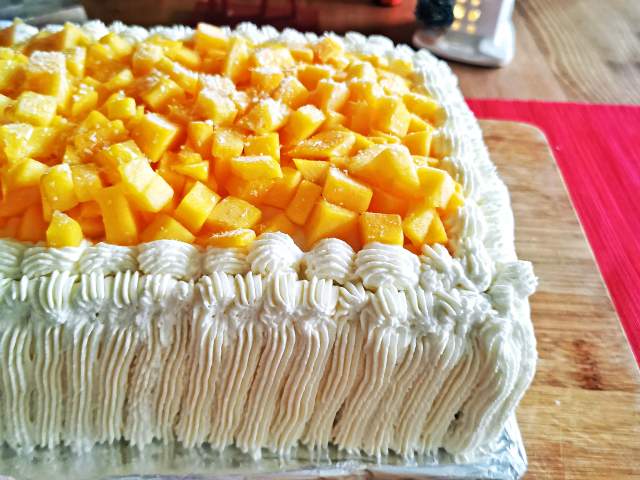
- On the top of the cake, mark out a rectangle, with the sides about 2 cm from the edge.
- Pipe frosting from the bottom going up, ending at the line you marked. Go all around the cake.
- Pipe a shell border to mark out the rectangle in the middle then fill with mango cubes.
- Freeze at least overnight.
- Remove from the freezer at least an hour before serving and drizzle with chocolate sauce.


