
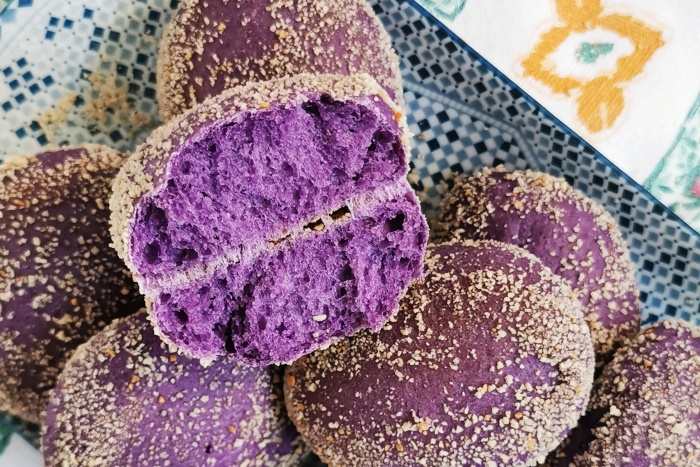
A variation on the classic Filipino favorite is the ube pandesal.
I have been trying to make ube pandesal for a while now, and the results were not what I wanted. The bread tasted gritty due to the dehydrated ube that I was using.
Who knew all I needed to do was rehydrate the ube powder? That worked perfectly.
If you have frozen ube, I suspect you might need to cook it, but I haven’t tried that yet. Waiting until all the madness around COVID-19 is over so we can drive to Germany and I can buy that again. I will then update this with the results of that experiment.
My youngest loved these. She couldn’t resist stealing one while I was taking pictures.

Ube pandesal recipe steps
if this is the first time you for you to make pandesal, please refer to my pandesal recipe for step-by-step videos and general bread making tips.
The full recipe below makes 24 to 32 pandesal. I also gave the amounts for half the recipe if you want to make less.
There is also an option to add cheese in the middle if you want an ube cheese pandesal. I have tried adding cheddar cheese and it worked out great.
Please note: Amounts in the directions below is for the full recipe.
Pin the ube pandesal recipe for future reference:


Ube Pandesal
Ingredients
For 24 to 32 pcs
- 500 g bread flour around 4 cups
- 90 g granulated sugar 7 ¼ tbsp
- 7 grams fine sea salt 1 tsp
- 100 g unsalted butter, at room temperature around 7 tbsp
- 50 g ube powder, rehydrated with 125g boiling water around ¼ cup ube powder rehydrated with 1/2 cup boiling water
- 2 tsp ube flavoring
- 250 – 280 grams warm water or 50% warm milk around 1 c + 1 tbsp – 1 +2 tbsp cup warm water (around 30°C/86°F is fine), or 50% warm milk
- 7 grams instant or active dry yeast about 2 ¼ teaspoons
For 12 – 16 pieces
- 250 g bread flour around 2 cups
- 45 g granulated sugar 3 1/2 tbsp
- 4 grams fine sea salt 3/4 tsp
- 50 g unsalted butter, at room temperature around 3 1/2 tbsp
- 25 g ube powder around 2 tbsp, rehydrated with 60 g (1/4 c)boiling water
- 1 tsp ube flavoring
- 130 – 180 grams warm water (around 30°C/86°F is fine), or 50% warm milk around 1/2 c + 2 tsp – 3/4 warm water (around 30°C/86°F is fine), or 50% milk
- 1 tsp instant yeast or active-dry yeast
Instructions
USING A STAND-MIXER
- If using active-dry yeast, activate the yeast first. Dissolve the yeast in ¼ cup (60 milliliters) of warm water and 1 teaspoon sugar. Let stand for 5 to 10 minutes. If the mixture starts bubbling and increases in volume, the yeast is active and alive. If not, repeat this step with a new packet of yeast.
- If using instant yeast, mix the yeast directly into the flour.
- Weigh or measure out your flour into the bowl of your stand mixer.
- Add in the salt and sugar. Mix on low using the paddle attachment.
- Add in the softened butter and mix on low speed until distributed evenly.
- Add in the instant yeast/activated yeast.
- Mix the rehydrated ube and ube flavoring with 1 cup/240 ml (reduce by the water in the yeast mixture if you have activated the yeast.) If the dough is still too dry, slowly drizzle in more water until the dough is well moistened, but not too wet.
- If you have added too much water, add more flour, a tablespoon at a time.
- Optional step: autolyse. Cover the bowl and let it rest for at least 30 minutes and up to an hour.
- Change to the hook attachment and knead for about 15 minutes. Then test the dough by pinching a piece and stretching into a square. If you get a window pane, your dough is ready. If not, continue kneading and testing every 5 minutes.
- Once the dough is ready, scrape down and form the dough into a ball. Using the same bowl, cover and set aside for an hour or until it has doubled in size. Set in a warm area if your kitchen is too cold. In winter, I heat the oven quickly (turn on 1 minute at 100°C) and turn off and leave the light on. Then I put the bowl in the oven.
- Or bulk rise in the fridge overnight.
NO STAND MIXER/BY HAND
- Same note for the yeast as above.
- Weigh or measure out your flour into the bowl of your stand mixer.
- Add in the salt and sugar. Mix well with a wire whisk.
- Add in the butter, and work into the flour with your fingers. To do so, use your finger tips and rub the flour and butter together.
- Mix the rehydrated ube and ube flavoring with 1 cup/240 ml (reduce by the water in the yeast mixture if you have activated the yeast.)
- Once the butter is incorporated, make a well in the middle and add in the ube mixture and yeast. Mix in with a rubber spatula. If too dry, slowly add in more water a little at a time until you get a shaggy dough.
- Cover with a kitchen towel and set aside to autolyse for at least 30 minutes (up to an hour). Very important step to hydrate the flour.
- After the autolyse, turn out the dough onto your work area and knead for 2 to 5 minutes. Add a bit flour if it is too sticky.
- Cover again and set a timer for 30 minutes.
- After 30 minutes, do a series of stretch and folds.
- At this point, you may then continue with the bulk rise. Set the dough aside for an hour or until it has doubled in size. Set in a warm area if your kitchen is too cold. In winter, I heat the oven quickly (turn on 1 minute at 100°C) and turn off and leave the light on. Then I put the bowl in the oven.
- Or bulk rise in the fridge overnight.
SHAPING
- Once the dough has doubled, punch down and ease out onto a floured surface. Divide depending if you want big or small-ish rolls. If you want big rolls, divide into 2, then roll into logs (about 30 cm/12 inches long and 5 cm/2 inches wide). For smaller rolls, divide dough into 4, roll each piece of dough into logs, about 20 cm/8 inches long and 4 cm/1.5 inches wide).
- Then pat one piece of dough into a rectangle, eliminating as much air as possible.
- Then roll the dough tightly, pressing each row tightly into the dough. Once you get a log, roll and pat the log into shape.
- Prepare 2 baking sheets by lining them with baking paper or silicon baking mats. Pour your breadcrumbs into a shallow bowl.
- Cut each dough using a dough cutter or a flat knife, into 1 inch/2.5-centimeter-thick pieces. Roll each piece in the breadcrumbs and arrange on the baking sheets making sure there is space in between as these will still rise. Cover with a dry kitchen towel and let rest until it has puffed up a bit (but not doubled), 30 minutes to 1 hour (depending on how cold your kitchen is.)
- Alternatively, you may weigh out the dough into 40 to 45 gram pieces and shape into rolls. Cover with breadcrumbs, then pinch the ends to give them that traditional pandesal look.
- While the pandesal near the end of its proofing, (usually around 30 to 45 minutes, depending on the warmth of your kitchen)preheat oven to 375°F/180°C.
- When the pandesal is ready (do the poke test), bake in the oven for 18 to 20, alternating the trays halfway.
Notes
- The ube makes the dough sticky. Please do not add too much flour. You can place your dough in the refrigerator for an hour or two when it has almost doubled to make shaping easier.
- Using milk makes for a more tender crumb. If that is what you prefer, substitute milk for 50% of the water or even all. Do not be afraid to experiment, this will still be yummy!
- I have also tried this with ube jam, 100 to 150 grams for the whole recipe, but I would lessen the sugar a bit as the jam is already sweetened.
- You may also cut cheese cubes and stuff the ube pandesal when shaping.


