
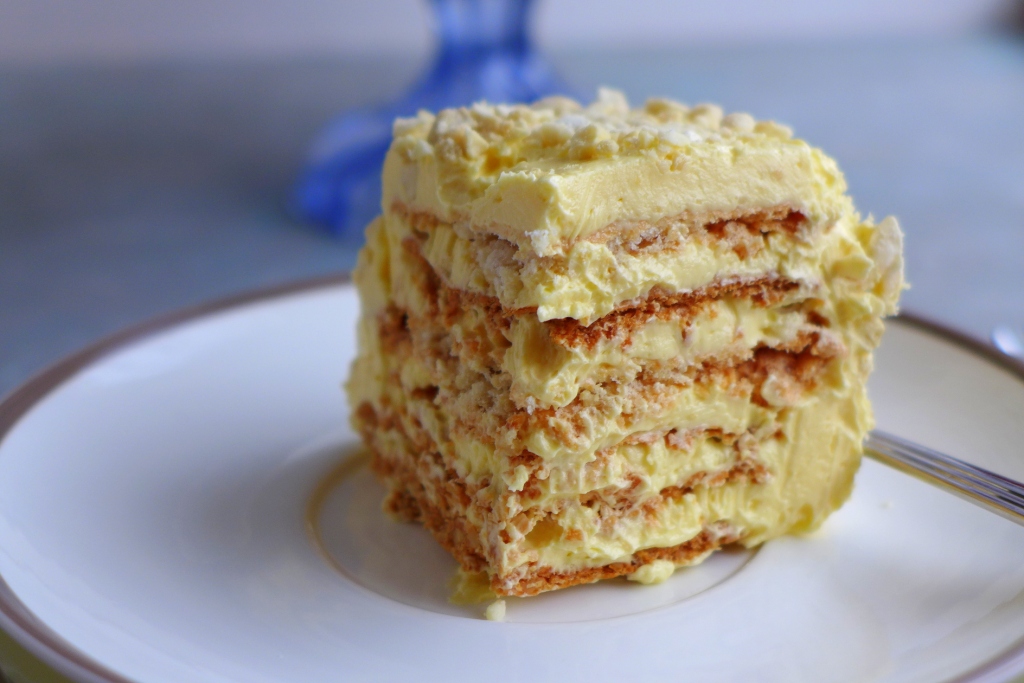
For me, no other Filipino dessert screams sumptuous than sans rival. Layers of crispy cashew meringue wafers are sandwiched between French buttercream and topped with more roasted cashews.
As a kid, we used to enjoy Sans Rival only on special occasions.
Cashew nuts weren’t cheap; therefore Sans Rival was pricey.
I remember we would order from a baker in the neighborhood, and it would arrive frozen, wrapped in layers of aluminum foil, in a homemade cardboard box.
We would then excitedly open it and receive a small slice, which we would savor.
I can still remember the crispiness of the cashew meringue, the sweetness of the buttercream, and the over-all delight I felt whenever I had a piece.
It was a slice of heaven.
As time passed, we had more cafes popping up in Bacolod. They all offered delicious cakes and pastries, including the Sans Rival, but none equaled the Sans Rival of my childhood.

What is Sans Rival?
Literally, “sans rival” is “without rival” in French. This delectable dessert was said to have been brought by Filipino housewives who studied French cooking in France in the 1920’s.
The process to preparing the cashew meringue is similar to the French Dacquiose (which is simply a nut meringue.)
Sans Rival is not difficult to prepare, but as with all meringues, you have to take care that your bowl is grease-free and the egg whites are at room temperature.
The recipe for the cashew meringue wafers is based on Nora Daza’s recipe in her cookbook, Let’s Cook with Nora, and the French Buttercream from Alice Medrich.
A note on cashew nuts:
Roasted, unsalted cashew nuts give the best flavor to the Sans Rival.
If you cannot find roasted, unsalted cashew nuts in the grocery, grab a pack of raw cashew nuts and roast it yourself.
I roast my cashew nuts in the microwave, as it does the job done quicker than the oven.
To do so, place then nuts in a single layer in a plate and microwave on HIGH for 2 minutes. Give a stir then microwave again on HIGH for one-minute intervals (stirring in between) until fragrant and slightly brown.
You may also roast the nuts in the oven, on the stove-top or toaster oven. You have a lot of different ways to get those slightly brown, fragrant nuts.
Let’s get started
First, prepare your baking pans or cookie sheets.
Line 3 baking pans or cookie sheets with parchment paper and draw 6 rectangles each measuring 10 x 6 inches (25.5 x 15cm) or 4 8-in (20cm) round circles (trace your cake pan!) Then place the parchment paper with the patterns facing down (so you won’t get the lead from the pencil on you meringues).
Don’t forget to GREASE the parchment paper!!! You will want your meringue to come off easily.
I’ve forgotten to do so in the past, and I ended up with meringue crumbs. Not a happy memory!
Preheat oven to 285°F/140°C.
Then, we will make the cashew meringue.
Chop the roasted cashews, but not too fine. I suggest that you have a mix of finely chopped and roughly chopped cashew nuts.
A food processor will chop the cashew nuts the fastest, so if you have one, use it. Otherwise, a knife will do the job as well.

Wipe your bowl with a paper towel and some white vinegar to remove any last traces of grease.
UPDATE: I have since been making the cashew meringue wafers with cornstarch and I find it retains its crispiness better. Updated recipe below.
Start by beating the egg whites on medium speed with the cream of tartar until soft peaks form.
Gradually add the granulated sugar and increase the speed to high. Continue beating until stiff.

Gently fold in the chopped cashew nuts and vanilla.
Divide equally among your pans. Spread the meringue thinly with an offset spatula.

Bake for 40 minutes to 1 hour, rotating the pans every 20 minutes.
The meringue wafers should be golden brown.
Turn off the oven and crack open the door. Let the meringue wafers cool in the oven so that they will retain their crispiness.
Time to decorate the Sans Rival!
Prepare your buttercream. See here for the detailed instructions.
Once the meringue wafers are cool, remove them from the parchment paper. Be gentle. You don’t want to break them, but if you do, don’t fret. The buttercream will cover it!
I always manage to get cracks on one or two wafers!!
On your serving plate or a cake board, spread a thin layer of buttercream. Place the first wafer. Top with more buttercream and spread.

Don’t use too much force or the meringue wafer below might crack.
Continue doing so until all the layers are stacked up.

Cover the cake with the rest of the buttercream, and decorate with more roasted cashew nuts.

Freeze for at least 2 hours before serving.
I like to pack the entire cake into 2 layers of foil and then place in the freezer.
This also extends the shelf life of the cake as it is so rich you wouldn’t want to eat a lot each time.
Enjoy your Sans Rival!
Pin here for future reference:

Calories
Fat
Carbs
Protein

Tweety
Yields 1 cake
Decadent sans rival is made up of crispy cashew meringue wafers sandwiched with French buttercream.
The prep time includes the minimum freezing time.
2 hr, 30 Prep Time
1 hrCook Time
3 hr, 30 Total Time

 Save Recipe
Ingredients
- 1 cup + 2 tbsp (150 grams) roasted, unsalted cashew nuts, chopped, plus more for decorating
- heaping 1/4 c (35g) cornstarch
- 6 large egg whites, at room temperature
- ¼ tsp cream of tartar
- ¾ cup (150 grams) granulated sugar
- 1 tsp vanilla
- 6 large egg yolks
- 1 large egg
- 1 1/3 cup (265 grams) sugar
- ½ cup (120 ml) water
- 375 grams butter, at room temperature, cut into cubes (roughly 1 cup + 11 tablespoons butter)
- Large pinch of salt
Directions
- First, prepare your baking pans or cookie sheets.
- Line 3 baking pans or cookie sheets with parchment paper and draw 6 rectangles each measuring 10 x 6 inches (25.5 x 15cm) or 4 8-in (20cm) round circles (trace your cake pan!) Then place the parchment paper with the patterns facing down (so you won’t get the lead from the pencil on you meringues).
- Don’t forget to GREASE the parchment paper!!! You will want your meringue to come off easily.
- Preheat oven to 285°F/140°C.
- Make the cashew meringue. Chop the roasted cashews, but not too fine. I suggest that you have a mix of finely chopped and roughly chopped cashew nuts.
- A food processor will chop the cashew nuts the fastest, so if you have one, use it. Otherwise, a knife will do the job as well. Transfer to a bowl and mix in the cornstarch.
- Wipe your bowl and beaters with a paper towel soaked in some white vinegar to remove any last traces of grease.
- Start by beating the egg whites on medium speed with the cream of tartar until soft peaks form.
- Gradually add the granulated sugar and increase the speed to high. Continue beating until stiff. Gently fold in the chopped cashew nuts and vanilla.
- Divide equally among your pans. Spread the meringue thinly with an offset spatula.
- Bake for 40 minutes to 1 hour, rotating the pans every 20 minutes.
- The meringue wafers should be golden brown and dry to the touch.
- Turn off the oven and crack open the door. Let the meringue wafers cool in the oven so that they will retain their crispiness.
- In a medium stainless steel bowl (if you have a Kitchen Aid, the metal bowl will work well) or double boiler, combine the egg yolks or eggs, water and salt. Whisk together to combine. Add in the sugar and mix well.
- Place the bowl over a pan filled with hot water (like here) and whisk constantly until the mixture reaches a temperature of 70°C/158°F. If you don’t have a thermometer, pinch a bit of the mixture and it should be hot, but not scalding.
- Wipe the bottom of the bowl and whip the mixture on high for 3 – 5 minutes, until it becomes a soft fluffy foam (like whipped cream) and is cool to the touch.
- Add in the butter one cube at a time and mix well until it is creamy and smooth.
- Once the meringue wafers are cool, remove them from the parchment paper. Be gentle. You don’t want to break them, but if you do, don’t fret. The buttercream will cover it!
- On your serving plate or a cake board, spread a thin layer of buttercream. Place the first wafer. Top with more buttercream and spread. Don’t use too much force or the meringue wafer below might crack.
- Continue doing so until all the layers are stacked up.
- Cover the cake with the rest of the buttercream, and decorate with more roasted cashew nuts.
- Freeze for at least 2 hours before serving.
- I like to pack the entire cake into 2 layers of foil and then place in the freezer.
- This also extends the shelf life of the cake as it is so rich you wouldn’t want to eat a lot each time.
Notes
If you are using a hand held mixer to make the French buttercream, decrease the amount of water to 1/3 cup or 80 ml.

